Handprint & Footprint Wild Creatures
Childhood is a fleeting canvas of rapid growth, curiosity, and boundless imagination. Among the most cherished keepsakes and highly engaging sensory activities are those that capture a child's exact size at a specific moment in time. Transforming painted handprints and footprints into whimsical animal shapes is more than just a delightful crafting session; it is a foundational, multi-sensory educational experience. This comprehensive lesson plan bridges the gap between artistic expression and early childhood development, tailoring the experience for children ages 3 to 10.
By integrating tactile exploration, fine motor skill refinement, and environmental science, this activity serves educators, homeschoolers, and parents alike. Below, you will find a complete, adaptable blueprint designed to minimize mess, maximize engagement, and inspire deep learning across multiple age groups.
Developmental Objectives & Educational Benefits
Before dipping tiny hands and feet into bright pigments, it is crucial to understand the learning pillars supporting this activity. Aligning art lessons with clear educational outcomes ensures that children absorb concepts while having fun.
Sensory Integration (Ages 3–5): The cold, squishy texture of tempera paint stimulates tactile neural pathways, helping toddlers and preschoolers process sensory inputs.
Fine Motor & Spatial Awareness (Ages 5–7): Pressing hands down uniformly requires deliberate physical coordination. Later, adding fine details like eyes, whiskers, and stripes builds precision grip and spatial reasoning.
Biological and Narrative Concepts (Ages 7–10): Older children can use their anatomical prints as a starting point to study animal adaptation, habitats, and symmetry, translating their artwork into storytelling or science journals.
Preparation and Materials Checklist
Success with paint-based crafts relies heavily on preparation. Organizing your workstation in advance minimizes clean-up stress and keeps children focused on creation. Gather the following high-quality, non-toxic materials before beginning:
Washable Tempera or Acrylic Paint: Ensure paints are explicitly labeled non-toxic and water-based. Vibrant primary and secondary colors work best.
Heavyweight Mixed-Media Paper or Cardstock: Standard printer paper will buckle and tear under wet paint. Opt for 110lb cardstock or watercolor paper.
Applicators: Foam rollers or wide, flat synthetic brushes allow for even paint distribution on skin.
Detail Tools: Fine-tipped paintbrushes, permanent markers, googly eyes, and non-toxic glue.
Sanitation Station: Shallow plastic trays filled with a thin layer of warm, soapy water, alongside several damp washcloths and dry towels.
Pro-Tip for Educators: Tape the corners of each child's cardstock to the table using low-tack painter's tape. This prevents the paper from lifting and smudging when the sticky, painted hand or foot is pulled upward.
Step-by-Step Lesson Execution
Step 1: Setting the Stage and Theme Selection
Begin with a brief, interactive discussion to spark inspiration. Ask the children about their favorite animals, where they live, and how they move. For younger children, read a vibrant picture book featuring diverse fauna. For older groups, introduce the concept of "metamorphosis in art," challenging them to see how the shape of a heel resembles a penguin's body, or how fingers mimic a lion's magnificent mane.
Step 2: Coating and Printing
Instead of dipping limbs directly into paint pots—which often results in thick, blurry blobs—use a foam brush to apply a thin, even layer of paint directly to the child's palm or sole. Guide the child to press down firmly onto the paper without wiggling. For footprints, have the child stand up completely while stepping on the paper (with an adult balancing them) to get a full, clear impression of the arch and toes.
Step 3: The Transition Period (Drying)
Immediately direct the child to the sanitation station. Wash limbs thoroughly before proceeding. Set the damp prints aside to dry for at least 30 to 45 minutes. This structural break is an excellent window for a short science lesson about the animals they are preparing to draw.
Step 4: Bringing the Animals to Life
Once the base prints are dry to the touch, the true transformation begins. Children will add identifying characteristics to turn abstract prints into recognizable fauna. Guide them with specific prompts based on their age bracket.
Age-Appropriate Adaptations
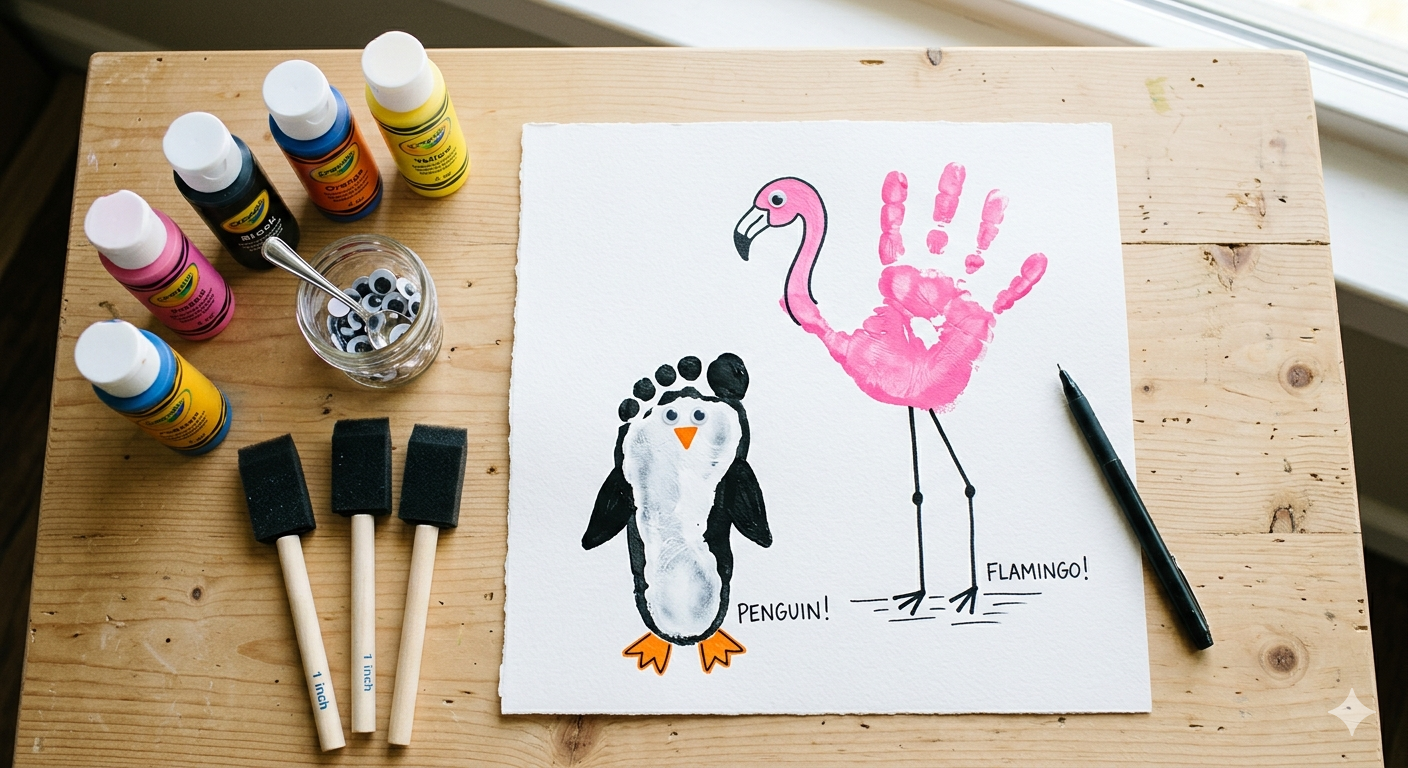
Preschool to Kindergarten (Ages 3–5)
Keep the transformations straightforward and intuitive. A classic approach is the Handprint Flamingo: turn the paper sideways so the thumb forms the long neck and head, while the remaining fingers represent the feathery body. Alternatively, create a Footprint Duck where the heel is the head and the toes represent the tail feathers. Assist these young learners by gluing on large googly eyes and using pre-cut orange construction paper triangles for beaks.
Early Elementary (Ages 6–8)
Children in this bracket possess the fine motor skills to create intricate patterns. Encourage them to try a Handprint Peacock. By overlapping multiple green and blue handprints in a semi-circle, they can simulate a grand, fan-like tail. Once dry, they can use fine brushes or cotton swabs to dot iridescent patterns onto each finger "feather." Another option is the Footprint Lion, where the foot serves as the face, and short, painted brushstrokes around the perimeter form a textured mane.
Upper Elementary (Ages 9–10)
Challenge older students to think structurally and conceptually. Ask them to combine multiple handprints and footprints into a cohesive scene or a singular composite animal, such as a multi-layered Footprint Elephant or a complex, overlapping Handprint Dragon. Encourage them to paint rich, realistic environmental backgrounds (savannahs, deep oceans, or rainforests) and write a short paragraph beneath the artwork describing the animal's diet, adaptations, and ecosystem.
Post-Activity Reflection and Classroom Display
Conclude the lesson by allowing each child to present their creation. Ask them to explain why they chose their specific animal and how they modified their natural prints to represent anatomy. Displaying these artworks side-by-side creates a stunning, diverse visual menagerie that builds community pride and highlights the unique physical individuality of every student's growth.