Thumbprint Animals
If you are a parent, educator, or daycare provider searching for a captivating, low-prep, and highly engaging craft, look no further than fingerprint art. Transforming simple thumbprints into adorable animals using everyday markers is a magical experience for children. It bridges the gap between messy sensory play and structured illustration, providing endless opportunities for imaginative expression.
Whether you are trying to fill a rainy afternoon at home or looking for a structured art lesson plan for an entire classroom, this activity scales perfectly for children ages 3 to 10. In this comprehensive guide, we will walk you through a complete, step-by-step fingerprint art lesson plan. You will learn how to set up the activity, guide children through the creative process, and adapt the craft for different age groups and skill levels.
Why Fingerprint Art is the Ultimate Craft for Kids
Art can sometimes be intimidating for young children. When faced with a blank piece of paper, a child might feel overwhelmed by the pressure to draw something "perfectly." Fingerprint art entirely removes this barrier to entry. By starting with a simple, colorful thumbprint, the child already has a solid foundation on the page. The blank canvas is instantly transformed into a colorful starting point.
Furthermore, fingerprint art is incredible for building creative confidence. When a child sees that a simple orange smudge can become a roaring lion with just a few strokes of a pen, it sparks a profound realization about shapes, representation, and art. It teaches children to look at abstract shapes and visualize concrete possibilities, a fundamental skill in both artistic and cognitive development.
Gather Your Supplies: What You Need for Thumbprint Animals
One of the greatest advantages of this lesson plan is the minimal equipment required. You likely already have most of these supplies tucked away in a craft closet.
Washable Ink Pads: This is the most crucial ingredient. Invest in a rainbow palette of non-toxic, washable ink pads. Dye-based inks dry faster, which is ideal when kids are eager to start drawing over them.
High-Quality Paper: Standard printer paper works in a pinch, but thick cardstock, mixed media paper, or watercolor paper is much better. Thicker paper prevents the ink from bleeding through and holds up better to eager stamping.
Fine-Tip and Ultra-Fine Tip Markers: Black markers are essential for outlining and adding details like eyes, legs, and wings. Have a mix of fine tips (for younger kids) and ultra-fine tips (for older kids who want to add intricate details). Colored markers are also great for adding background elements.
Baby Wipes or Damp Paper Towels: You will need a designated cleaning station right at the table. Having baby wipes on hand allows kids to quickly clean their fingers before switching ink colors.
Art Smocks or Old T-shirts: Even washable ink can be a hassle to get out of light-colored clothing, so dress for the mess!
The Step-by-Step Fingerprint Art Lesson Plan
This lesson plan is designed to run for about 45 to 60 minutes, depending on the age and attention span of the children.
Phase 1: Set the Stage and Protect the Area
Before the kids even sit down, cover your work surface with a plastic tablecloth or old newspaper. Distribute the paper, but hold back the markers for now. If kids have the markers too early, they might start drawing before the ink is fully dry. Place the ink pads and an open pack of baby wipes in the center of the table.
Phase 2: Demonstrate the “Press and Lift" Technique
Gather the children around and demonstrate how to make the perfect fingerprint. Show them how to gently press their thumb or index finger onto the ink pad—remind them they don't need to push hard! Then, show them how to press firmly onto the paper and lift straight up. Emphasize that sliding or wiggling their finger on the paper will create a smear, not a crisp print. Allow them to spend 10 to 15 minutes simply stamping colorful prints all over their page. Encourage them to use different fingers for different sizes.
Phase 3: The Mandatory Drying Break (And Hand Washing!)
Once their pages are populated with a colorful array of thumbprints, it is time for a mandatory break. Ink needs a few minutes to dry; otherwise, the markers will smudge, and the marker tips will get ruined by wet ink. Use this time to have the children thoroughly wash their hands. By the time their hands are clean and dry, their paper will be ready.
Phase 4: Transform Prints into Animals (The Magic Phase)
Hand out the black markers. Ask the children to look at their dots and imagine what they could be. Demonstrate a few examples on a whiteboard or a piece of scratch paper:
Add eight legs to a black print for a spider.
Add two wings and antennae to a yellow print for a bee.
Add a curly tail and a snout to a pink print for a pig.
Let their imaginations run wild. Encourage them to turn mistakes (smudged prints) into unique creatures like fluffy monsters or crawling caterpillars.
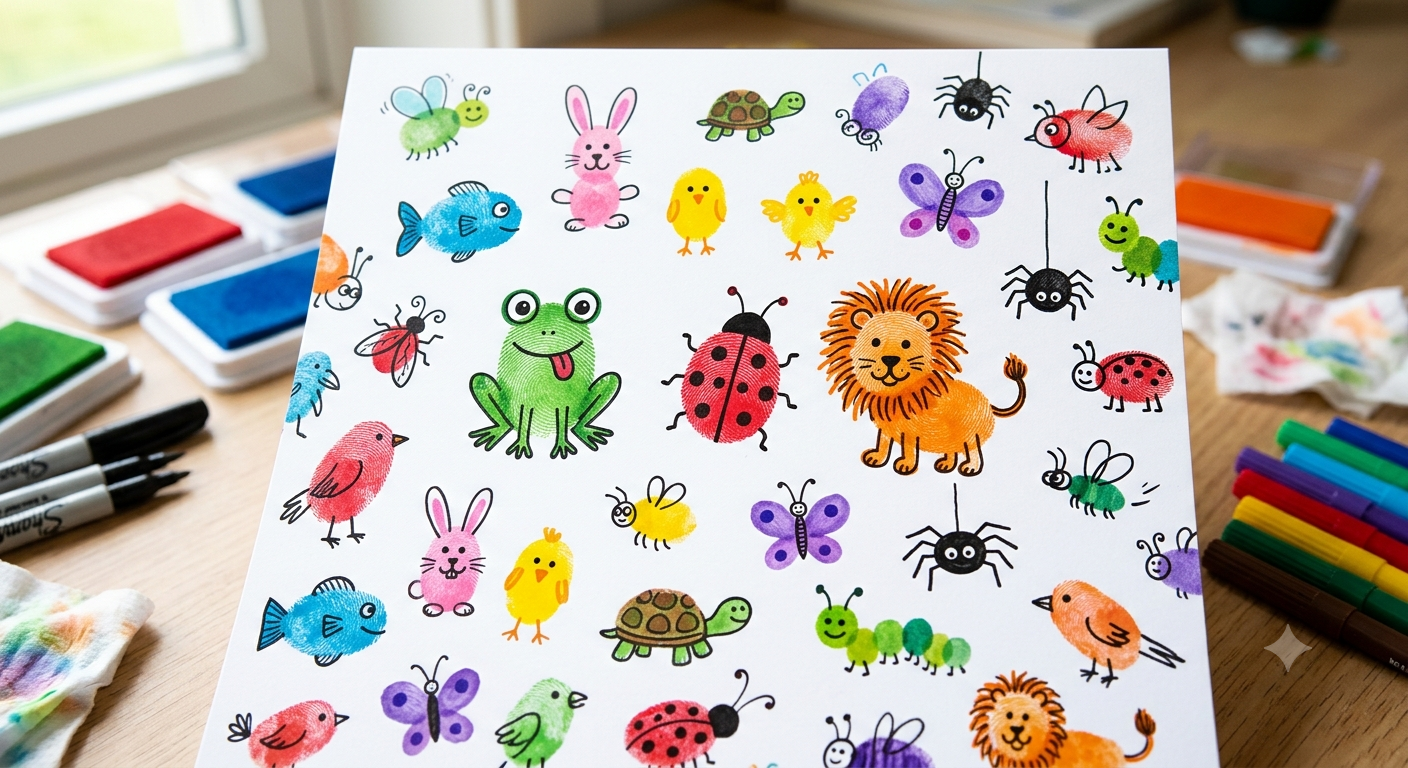
Age-Specific Thumbprint Animal Ideas
To make this lesson plan effective, you must tailor your expectations and suggestions to the child's developmental stage.
Little Explorers (Ages 3-5)
For toddlers and preschoolers, fine motor control is still developing. Keep the marker additions incredibly simple.
The Hungry Caterpillar: Have them stamp a line of green prints, followed by one red print at the end. They only need to draw two little lines for antennae and two dots for eyes.
Bumblebees: A yellow print needs just a few black stripes across the back and loop-de-loop wings.
Ladybugs: A red print requires a black semi-circle at the top for a head, a line down the back, and a few polka dots.
Budding Artists (Ages 6-8)
Children in early elementary school have better dexterity and can handle slightly more complex concepts, like animals in motion or multi-print animals.
The Roaring Lion: An orange print serves as the body. Children can draw a wild, spiky mane surrounding the print, along with a long tail ending in a tuft of fur.
School of Fish: Blue and purple prints can be turned into fish by drawing triangular fins, a puckered mouth, and a trail of tiny bubbles floating up to the surface.
Frog on a Lily Pad: A green thumbprint can be the frog's body. They can draw long, bent legs for jumping and place the frog on a large green marker lily pad.
Master Illustrators (Ages 9-10)
Older children will appreciate the challenge of creating detailed scenes, adding perspective, and inventing highly textured creatures.
The Prickly Hedgehog: A brown print can be covered in hundreds of tiny, ultra-fine marker lines to represent sharp quills, complete with a tiny pointed nose.
Birds on a Wire: Draw a single black line across the page. Have the kids place colorful prints right on top of the line. They can then add beaks, intricate tail feathers, and tiny clawed feet gripping the wire.
Ecosystems: Challenge them to create a full scene. For example, an under-the-sea page featuring fingerprint jellyfish with long, flowing tentacles, fingerprint turtles with patterned shells, and fingerprint crabs with sharp claws.
Educational and Developmental Benefits
Beyond being incredibly fun, this fingerprint art lesson plan offers substantial developmental benefits. Using the markers to draw tiny details on small thumbprints requires a refined pincer grasp, which strengthens the hand muscles essential for handwriting. It also heavily promotes hand-eye coordination.
Cognitively, this activity is an excellent exercise in divergent thinking. The child has to look at a generic shape (an oval thumbprint) and brainstorm multiple outcomes (a balloon, a bug, a face, an animal). It teaches problem-solving and spatial planning, as they must figure out how to fit legs, wings, and faces within a limited physical space on the paper.
Conclusion
Fingerprint art is a timeless, magical craft that proves you don't need expensive materials or years of training to create something beautiful. By turning thumbprints into animals, kids ages 3 to 10 can engage their imaginations, practice their fine motor skills, and produce artwork they will be genuinely proud of. So, roll up those sleeves, break out the ink pads, and get ready to create a miniature thumbprint zoo today!